Let me share how I recently helped a client move their WordPress site to a new host. Trust me, it’s not as scary as it sounds! After doing this dozens of times, I’ve found that using the All-in-One WP Migration plugin makes the whole process pretty painless.
Getting Started: Before You Move Anything
First things first – you’ll need to grab the All-in-One WP Migration plugin on your current site. Just hop into your WordPress dashboard, click on Plugins > Add New, and search for it. Install it, activate it, and you’re ready for the next step.

Making Your Backup: The Important Stuff
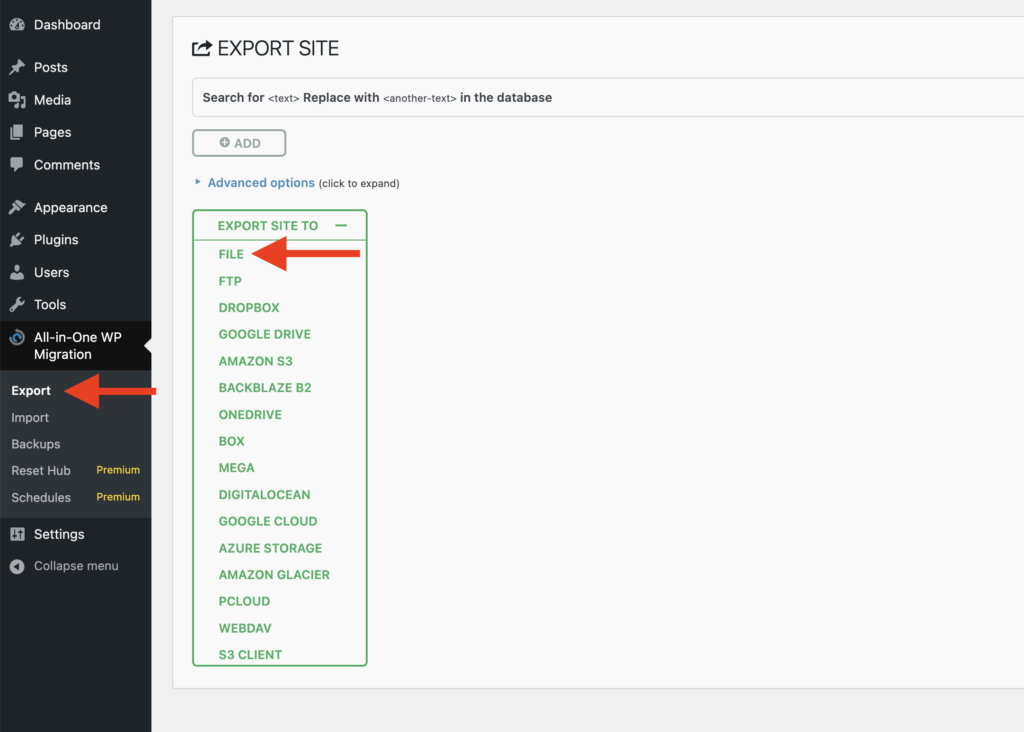
Once you’ve got the plugin installed, look for it in your dashboard’s left sidebar. Click on the Export option – this is where the magic happens. You’ll see a bunch of export options, but I usually just go with the “Export to File” choice since it’s the most straightforward. Hit that button and wait for your backup file to download. Easy peasy!

Update DNS Settings
- Log into your domain registrar (e.g., GoDaddy, Namecheap).
- Update the nameservers to point to your new hosting provider.
- Wait for DNS propagation (can take up to 48 hours, but often less).
Setting Up Your New Home
Before we move your site over, we need to get your new hosting ready. Make sure you’ve got a fresh WordPress installation on your new host – most hosting providers make this super simple through their control panel.
Don’t forget to install that same All-in-One WP Migration plugin on your new WordPress site. You’ll need it for the next part.
The Big Move: Importing Your Site
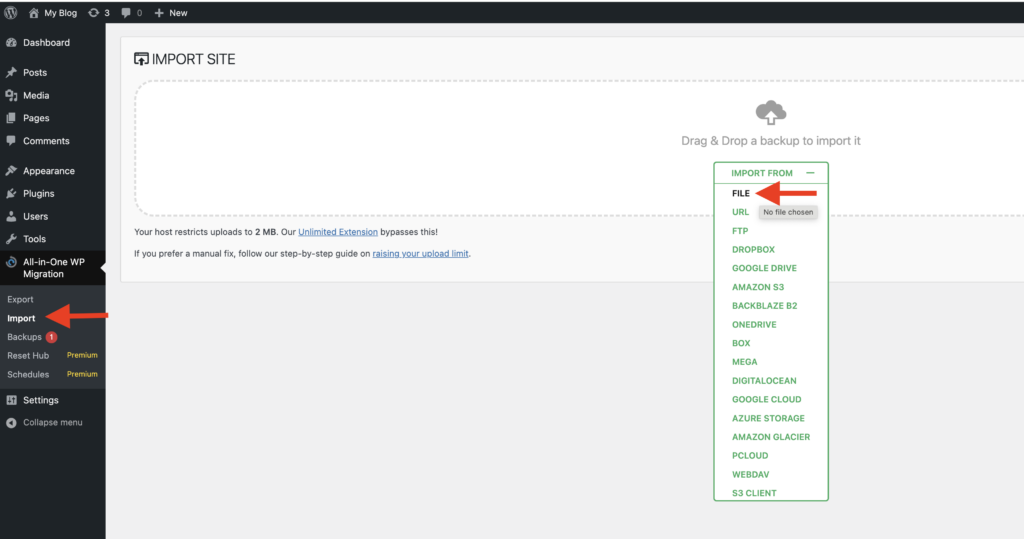
Here’s where it gets exciting! On your new WordPress site, go to All-in-One WP Migration and click Import. Choose the backup file you downloaded earlier, and let the plugin do its thing. It might take a few minutes, especially if you’ve got a bigger site.

Note: The default file upload limit for the All-in-One WP Migration plugin is 2MB, which may not be sufficient for most WordPress sites. If your backup file exceeds this limit, you’ll need to increase the upload size. I’ve written a detailed guide on how to increase the upload limit—check it out here.
Fine-Tuning Your New Site
After the import finishes, there are a few housekeeping tasks to tackle:
Head over to Settings > Permalinks and just hit Save Changes – this refreshes your link structure and keeps everything working smoothly.
Take your new site for a test drive – click around, make sure all your pages load correctly, and test any contact forms or other interactive elements you might have.
Pro Tips From Experience
From helping countless clients with their WordPress moves, I’ve learned a few tricks:
Remember to delete that backup file from your new site once everything’s working – it’s just good security practice.
Consider adding a caching plugin like WP Rocket to keep your site running fast.
Run a quick check for any broken links that might have snuck in during the move.
If your site’s loading slowly, try optimizing your images with a plugin like Smush – it can make a huge difference.
And that’s it! You’ve successfully moved your WordPress site. Not so bad, right? If you run into any snags along the way, drop a comment below, and I’ll help you troubleshoot.
